HGC #2: Create Dataset
| Code | GitHub |
|---|---|
| Part 1 | Overview |
Introduction
A dataset is a mandatory element in the implementation of projects using neural networks. It needs to be highlighted that it affects the learning process and thus plays a key role in predicting the final result. In situations where the written program does not give the expected score, the first element to pay attention is a dataset. A very common problem is its small size, which is not enough for the network to learn. Of course, we can add more elements to the set, but depending on the task at hand, it can be more or less troublesome. There are also other solutions, but in this project, it was decided not to use them and instead to provide the sufficient amount of learning data.
Dataset
There are two ways to approach the creation of a dataset that shows images of human hand gestures. The first of these is finding its on the Internet. After a brief surfing, several results were found. Each of them was characterized by some elements distinguishing from the others. Photos taken in the infrared, grayscale or on a uniform white surface are just a few suggestions. These features are important because a neural network will work best when an input data most closely resembles learning data. It is worth recalling that the program should work in real time. This means that if a dataset contains images of hand gestures in grayscale, the program should retrieve frames from a webcam and transform them into single channel images. While in this situation it is not a problem, it may appear when choosing photos taken in infrared.
For this reason, a second way of providing a dataset (i.e. “on your own”) will be used, taking advantage of hardware on which the final program will run. This task will be done by the Python script together with the following libraries: OpenCV, NumPy and OS.
Algorithm steps:
- Create directories representing hand gestures.
Go to the section: Directories - Capture and transform each webcam image.
Go to the section: Webcam Image - Save images in appropriate directories.
Go to the section: Labeling
Directories
Machine learning can be divided into several types. Our final application, will solve the problem of classification, so ultimately we are talking about supervised learning. Therefore, each element of the dataset must have a label, which in this case will be the name of the directory, corresponding to 1 hand gesture. Suppose we want to recognize 6 hand gestures, then the code might look like this:
# Create directories
if not os.path.exists(dir):
    os.makedirs(dir)
    os.makedirs(dir  + "/00")
    os.makedirs(dir  + "/01")
    os.makedirs(dir  + "/02")
    os.makedirs(dir  + "/03")
    os.makedirs(dir  + "/04")
    os.makedirs(dir  + "/05")
Webcam Image
At this point, let’s consider the optimal form of webcam image. The word “optimal” means the transformation of frames into a form that will not depend on the conditions or background while making a hand gesture. Another understanding of this word is “cost” with which the transformation will be done. A real-time program cannot afford the complicated and time-consuming operations that each frame will undergo. It is worth noting that the learned network will predict the result faster when the image is smaller. Therefore, the necessary condition seems to be reduction of image resolution, which in addition will not be the whole frame, but only its fragment (ROI - region of interest).
Moreover, to improve the generation of the binary mask (below), preprocessing using the bilateral filter will be applied.
def pretreatment(img):
    img = cv2.bilateralFilter(img,5,50,100)
    img = cv2.bilateralFilter(img,9,75,75)
    return img
# img - frame after pretreatment
# img_org - original frame
def getROI(img, img_org):
    # ROI parameters
    bound_size = 2
    x1_roi = int(0.5*img.shape[1]) - bound_size
    y1_roi = 10 - bound_size
    x2_roi = img.shape[1]-10 + bound_size
    y2_roi = int(0.5*img.shape[1]) + bound_size

    cv2.rectangle(img_org, (x1_roi, y1_roi), (x2_roi, y2_roi), (0,255,0), bound_size)
    return img[y1_roi+bound_size:y2_roi-bound_size, x1_roi+bound_size:x2_roi-bound_size]
Binary Mask
To become independent of the conditions (e.g. background) on which the hand gesture will be performed, the image will be binarized, so it will consist of only two colors. The desired effect is a white hand on a black background. The parameter needed for this operation is the so-called threshold, which is a value that indicates when a given pixel should have a given color. After long tests, it can be seen that it is practically impossible to select the ideal value of this parameter, meeting the expected assumptions. This is primarily due to the different lighting conditions under which the program is started. The second thing to pay attention to is the difficulty of isolating the human hand from the scene. For this reason, you need to give up the “rigid” binarization of each frame of the image. Instead, a background subtraction process will be used, which is an algorithm for detecting moving elements. It segments shifting objects by the difference between the background and the input image. In the OpenCV library you can find several such algorithms (e.g. KNN, MOG2). The resulting mask will undergo a binarization process using the Otsu method. This way the threshold is calculated for each image. It follows that the value is not determined for specific lighting conditions that, when changing, do not properly isolate the hand from the background. Instead, it adopts different values that are optimal in a given situation.
def bgSubtraction(img):
    mask = backSub.apply(img)
    _, mask = cv2.threshold(mask, 0, 255, cv2.THRESH_BINARY + cv2.THRESH_OTSU)
    return mask

backSub = cv2.createBackgroundSubtractorKNN()
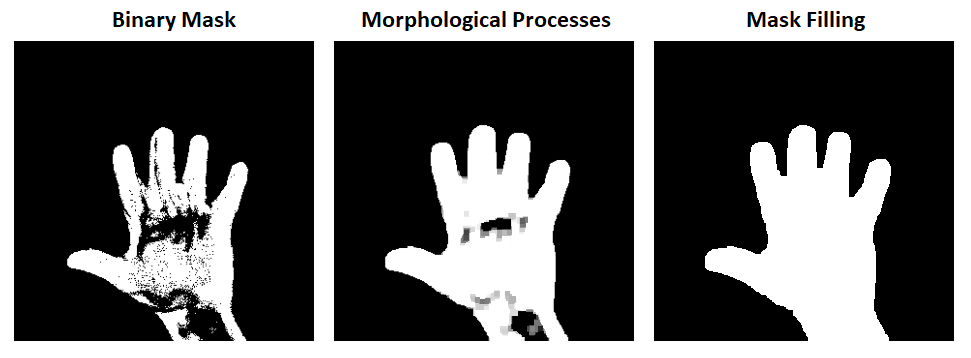
As said before, the background subtraction algorithm is used to detect moving objects. In case of gesture control, this object will be the human hand. When making various gestures, certain parts of the hand often remain motionless. The algorithm will notice this after some time and will stop interpreting the hand as a moving object. The result will be black clusters of pixels in a white space representing a human gesture. In order to extend the effect of a perfectly isolated hand (without black pixel holes), two methods will be used: morphological operations and filling the found contour.
Morphological Operations
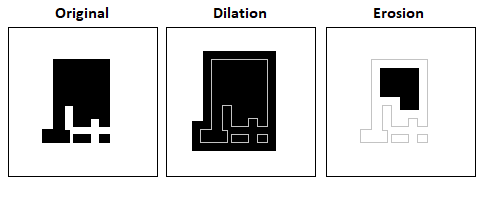
They are used to analyze shapes and perform operations on them. Their main component is a structuring element, i.e. a section (subset) of the image with a highlighted focal point, which works as a moving window. The following will be used in this project:
- dilation - widens the shape so that objects have a thicker border;
- opening - combination of erosion (shape constriction) + dilatation, allows to get rid of the noise that occurs outside the area of the hand;
- closing - combination of dilatation + erosion, ensures complement to the black holes of pixels in the hand area.
def morphologicalProcess(fgMask):
    kernel = np.ones((3,3),np.uint8)
    fgMask = cv2.dilate(fgMask,kernel,iterations = 2)

    kernel = np.ones((3,3),np.uint8)
    fgMask = cv2.morphologyEx(fgMask, cv2.MORPH_OPEN, kernel)

    kernel = np.ones((5,5),np.uint8)
    fgMask = cv2.morphologyEx(fgMask, cv2.MORPH_CLOSE, kernel)
    return fgMask
It can be seen that a different size of structuring element can be used for each morphological operation.
During the dilatation, the object increases its surface area. In the case of opening and closing, the analyzed shapes do not change their size.
Filling the Found Contour
Its purpose will be to help morphological closing, in case of large holes of black pixels. The filling will become more effective with the use of dilatation. The goal is to find a white closed contour in the processed image that will be filled with white pixels.
def fillMask(fgMask):
    floodfilled_img = fgMask.copy()

    # Mask - flood filling (size +2 pixels)
    h, w = fgMask.shape[:2]
    mask = np.zeros((h+2, w+2), np.uint8)

    cv2.floodFill(floodfilled_img, mask, (0,0), 255);

    inverted = cv2.bitwise_not(floodfilled_img)

    # Get foreground (combine of two images)
    foreground = fgMask | inverted
    return foreground
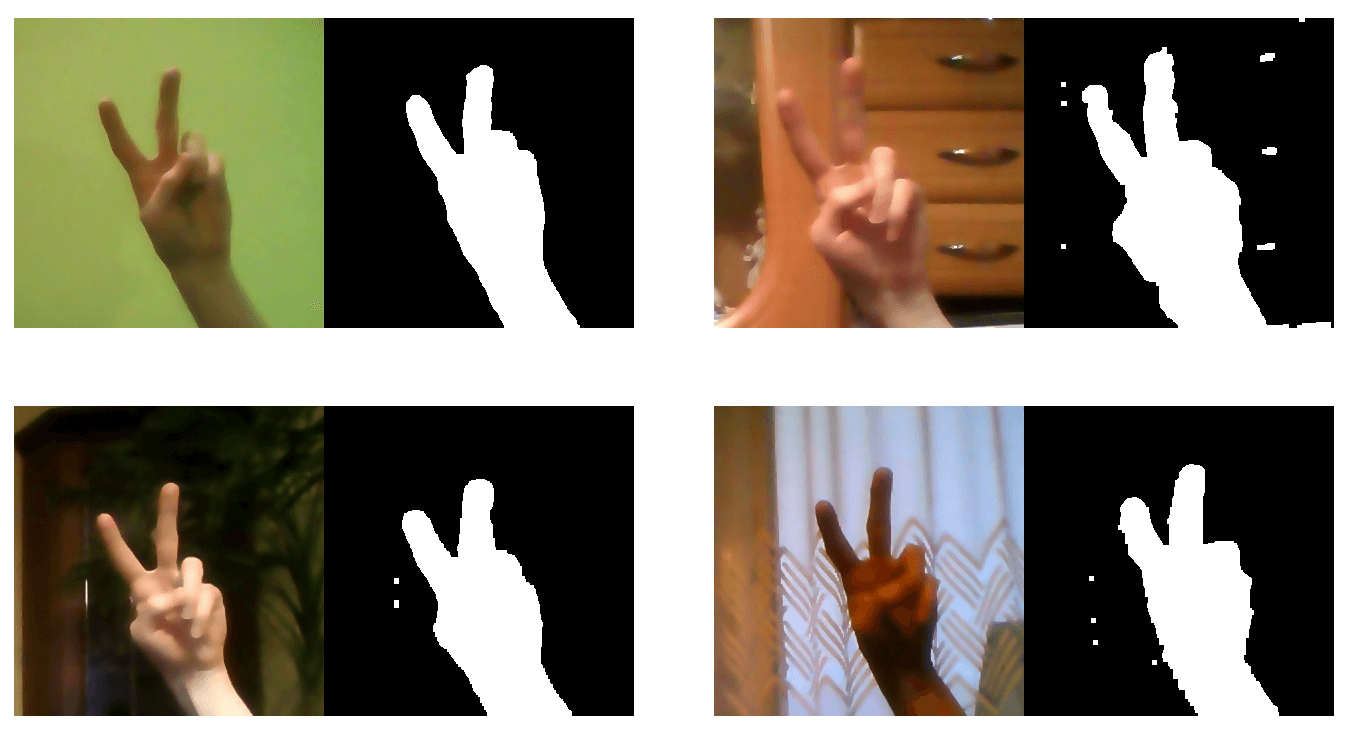
The final effect of generating a mask under different conditions:
Labeling
The last step will be to give the appropriate label. For this purpose, each webcam image will be processed, and after pressing the key (0-5, because of the 6 classes), it will be saved in a dedicated directory, with the name that defines its label. As I said before, the neural network processes smaller images faster, so they will be saved at 128x128 resolution.
fgMask_filled = cv2.resize(fgMask_filled, (128, 128))

# Exit the program or save the image (ROI)
k = cv2.waitKey(10)
if k & 0xFF == ESC:
    break
if k & 0xFF == ord('0'):
    cv2.imwrite(dir + '00/' + str(img_sum[0]) + '.jpg', fgMask_filled)
if k & 0xFF == ord('1'):
    cv2.imwrite(dir + '01/' + str(img_sum[1]) + '.jpg', fgMask_filled)
if k & 0xFF == ord('2'):
    cv2.imwrite(dir + '02/' + str(img_sum[2]) + '.jpg', fgMask_filled)
if k & 0xFF == ord('3'):
    cv2.imwrite(dir + '03/' + str(img_sum[3]) + '.jpg', fgMask_filled)
if k & 0xFF == ord('4'):
    cv2.imwrite(dir + '04/' + str(img_sum[4]) + '.jpg', fgMask_filled)
if k & 0xFF == ord('5'):
    cv2.imwrite(dir + '05/' + str(img_sum[5]) + '.jpg', fgMask_filled)
That’s all. I encourage you to see the whole code here to dispel any doubts.






Leave a comment